Building a Java application with Apache Nutch and Solr
Apache Nutch is a scalable web crawler that supports Hadoop. Apache Solr is a complete search engine that is built on top of Apache Lucene. In this tutorial, we make a simple Java application that crawls "World" section of CNN.com with Apache Nutch and uses Solr to index them. We are going to use both of them as libraries, which means Solr must be working without a servlet and HTTP connections. We will be using Eclipse as the IDE. This is going to be a long tutorial, so get yourself a cup of your favorite drink.Troy: GSoC 2012 Pronunciation Evaluation Week 2
Although quite frustrated with what i have encountered in the last few days, everyday i have to struggle with my own research and stay up to work on the open source project, but all my efforts are not recognized at all. Anyway it's better to keep a log of what i have done and then take some time to think how things should go on.
These are the things I've accomplished in the second week of GSoC 2012:
1. Set up a cron job for the rtmplite server to automatically check whether the process is still running or not. If it is stopped, restart it. This will allow the server to stay up if the machine gets rebooted, and will allow the server to spawn subprocesses without being stopped by job control as happens when the process is put into the background from a terminal shell. To accomplish this, I first created a .process file in my home directory with the rtmplite server's process id number as its sole contents. You can use 'top' or 'ps' to find out the process id of the server. Then I created this shell script file to check the status of the rtmplite server process:
pidfile=~/.process
if [ -e "$pidfile" ]
then
    # check whether the process is running
    rtmppid=`/usr/bin/head -n 1 ${pidfile} | /usr/bin/awk '{print $1}'`;
    # restart the process if not running
    if [ ! -d /proc/${rtmppid} ]
    then
       /usr/bin/python ${exefile} -r ${dataroot} &
       rtmppid=$!
       echo "${rtmppid}" > ${pidfile}
       echo `/bin/date` "### rtmplite process restarted with pid: ${rtmppid}"
    fi
fi
This script first checks whether the .process file exists or not. If we don't want the cron job to check for this process temporarily (such as when we apply patches to the program), we can simply delete this file and it won't check on or try to restart the server; after out maintenance, recreate the file with the new process id, and the checking will automatically resume.
The last and also the most important step is to schedule this task in cron by creating following item with the command crontab -e
* * * * * [path_to_the_script]/check_status.sh
This causes the cron system to run this script every minute, thereby checking the rtmplite server process every minute.
2. Implemented web server user login and registration pages using MySQL and HTML. We use a MySQL database for storing user information, so I designed and created this table for user information in the server's mysql database:
| Field | Type | Comments |
|---|---|---|
| userid | INTEGER | Compulsory, automatically increased, primary key |
| VARCHAR(200) | Compulsory, users are identified by emails | |
| password | VARCHAR(50) | Compulsory, encrypted using SHA1, at least 8 alphanumeric characters |
| name | VARCHAR(100) | Not compulsory, default 'NULL' |
| age | INTEGER | Not compulsory, default 'NULL', accepted values [0,150] |
| sex | CHAR(1) | Not compulsory, default 'NULL', accepted values {'M', 'F'} |
| native | CHAR(1) | Not compulsory, default 'NULL', accepted values {'Y', 'N'}. Indicating the user is a native English speaker or not. |
| place | VARCHAR(1000) | Not compulsory, default 'NULL'. Indicating the place when the user lived at the age between 6 and 8. |
| accent | CHAR(1) | Not compulsory, default 'NULL', accepted values {'Y', 'N'}. Indicating the user has a self-reported accent or not. |
This table was created by the following SQL command:
CREATE TABLE users (
   userid INTEGER NOT NULL AUTO_INCREMENT,
   email VARCHAR(200) NOT NULL,
   password VARCHAR(50) NOT NULL,
   name VARCHAR(100),
   age INTEGER,
   sex SET('M', 'F'),
   native SET('Y', 'N') DEFAULT 'N',
   place VARCHAR(1000),
   accent SET('Y', 'N'),
   CONSTRAINT PRIMARY KEY (userid),
   CONSTRAINT chk_age CHECK (age>=0 AND age<=150)
);
I also prototyped the login and simple registration pages are in HTML. Here are their preliminary screenshots:

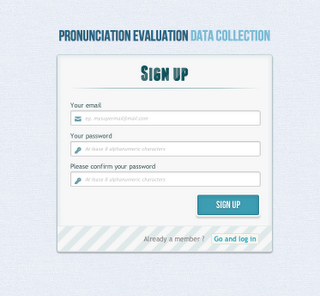
If you like, you can go to this page to help us test the system: http://talknicer.net/~li-bo/datacollection/login.php. On the server, we use PHP to retrive the form information from the login and registration pages, perform an update or query in mysql database, and then send data back in HTML.
The recording interface, has also been modified to use HTML instead of pure Flex as earlier. The page currently displays well, but there is no event interaction between HTML and Flash yet.
3. Database schema design for the entire project: Several SQL tables have been designed to store the various information used by all aspects of this project. Detailed table information can be found on our wiki page: http://talknicer.net/w/Database_schema. Here is a brief discussion.
First, the user table shown above will be augmented to keep two additional kinds of user information: one for normal student users and one for those who are providing exemplar recordings. Student users, when they can provide correct pronunciation, should also be allowed to contribute to the exemplar recordings. Also if exemplar recorders register through the website, they have to show they are proficient enough to contribute a qualified exemplar recording, so we should be able to use the student evaluation system to qualify them for uploading exemplar contributions.
There are several other tables for additional information such as languages for a list of languages defined by the ISO in case we may extend our project to other languages; a region table to store some idea of the user's accent; prompts table for the list of text resources will be used for pronunciation evaluation. Then are also tables to log the recordings the users do and tables for set of tests stored in the system.
Here are my plans for the coming week:
1. Discuss details of the game specification to finish the last part of schema design.
2. Figure out how to integrate the Flash audio recorder with the HTML interface using bidirectional communication between ActionScript and JavaScript.
3. Implement the student recording interface.
4. Further tasks can be found at: http://talknicer.net/w/To_do_list
Sphinx3 phoneme acoustic scores, CMUbet neighboring phonemes
(Author: Srikanth Ronanki)
(Status: GSoC 2012 Pronunciation Evaluation Week 1)
Last week, I accomplished the following:
- Successfully tested producing phoneme acoustic scores from sphinx3_align using two recognition passes. I was able to use the state segmentation parameter -stsegdir as an argument to the program, to obtain acoustic scores for each frame and thereby for each phoneme as well. But, the output of the program is to be decoded to integer format which I will try to do by the end of next week.
- Last week I wrote a program which converts a list of each phoneme's "neighbors," or most similar other phonemes, provided by the project mentor from the Worldbet phonetic alphabet to CMUbet. But, yesterday, when I compared both files manually, found some of the phones mismatched. So, I re-checked my code and fixed the bug. The corrected program takes a string of phonemes representing an expected utterance as input and produces a sphinx3 recognition grammar consisting of a string of alternatives representing each expected phoneme and all of its neighboring, phonemes for automatic edit distance scoring.
All the programs I have written so far are checked in at http://cmusphinx.svn.sourceforge.net/viewvc/cmusphinx/branches/speecheval/ronanki using subversion. (Similarly, Troy's code is checked in at http://cmusphinx.svn.sourceforge.net/viewvc/cmusphinx/branches/speecheval/troy.)
Here is the procedure for using that code to obtain neighboring phonemes of CMUbet from a file which contains a string of phonemes:
- To convert Worldbet phonetic alphabet to CMUbet
- To convert input list of phonemes to neighboring phones
python convert_world2cmu.py
python convert2_ngbphones.py
- Ex: "I had faith in them" (arctic_a0030) - a sentence from arctic database:
Troy: GSoC 2012 Pronunciation Evaluation Week 1
The first week of GSoC 2012 has already been a busy summer. Here is what I have accomplished so far:
- To measure the Speex recording "quality" parameter (which is set by the client from 0 to 10) I recorded the same Sphinx3 test utterance ("NO ONE AT THE STATE DEPARTMENT WANTS TO LET SPIES IN") with the quality varying from 0 to 10. As shown on the graph, the higher the Speex quality parameter, the larger the .FLV file will be. Judging from my own listening, greater quality parameter values do result in better quality, but it is difficult to hear the differences above level 7. I also tried to generate alignment scores to see whether the quality affects the alignment. However, from the results shown in the following graph, the acoustic scores seems essentially identical for the different recordings. But to be on the safe side in case of background and line noise, for now we will use a Speex recording quality parameter of 8.
- The rtmplite server is now configured to save its uploaded files to the[path_to_webroot]/data directory on the server. The initial audioRecorder applet will place its recordings in the [path_to_webroot]/data/audioRecorder directory, and for each user there will be a separate folder (e.g. [path_to_webroot]/data/audioRecorder/user1). For each recording utterance, the file name is now in the format of [sentence name]_[quality level].flv
- The conversion from .FLV Speex uploads to .WAV PCM audio files is done entirely in the rtmplite server using a process spawned by Python's subprocess.Popen() function calling ffmpeg. After the rtmplite closes the FLV file, the conversion is performed immediately and the converted WAV file has exactly the same path and name except the suffix, which is .wav instead of .flv. Guillem suggested the sox command for the conversion, but it doesn't recognize .flv files directly. Other possibilities included speexdec, but that won't open .flv files either.
- In the audioRecorder client, the user interface now waits for NetConnection and NetStream events to open and close successfully before proceeding with other events. And a 0.5 second delay has been inserted at the beginning and end of the recording button click event to avoid inadvertently trimming the front or end of the recording.
- Solve a problem encountered in converting FLV files to WAV using ffmpeg with Python's Popen() function. If the main Python script (call it test.py for example) is run from a terminal as "python test.py", then everything works great. However, if I put it in background and log off the server by doing "python test.py &", everytime when Popen() is invoked, the whole process hangs there with a "Stopped + test.py &" error message. I will try to figure out a way to work around this issue. Maybe if I start the process from cron (after checking to see whether it already running with a process ID number in a .pid text file) then it will start subprocesses without stopping as occurs when it is detached from a terminal.
- Finish the upload interface. There will be two kinds of interfaces: one for students and one for exemplar pronunciations. For the students, we will display from one to five cue phrases below space for a graphic or animation, assuming the smallest screen possible using HTML which would also look good in a larger window. For the exemplar recordings, we just need to display one phrase but we should also have per-upload form fields (e.g., name, age, sex, native speaker (y/n?), where speaker lived ages 6-8 (which determines their accent), self-reported accent, etc.) which should persist across multiple uploads by the same user (perhaps using HTTP cookies.) I want to integrate those fields with the mysql database running on our server, so I will need to create a SQL schema with some CREATE TABLE statements to hold all those fields, the filenames, maybe recording durations, the date and time, and perhaps other information.
- Test the rtmplite upload server to make sure it works correctly and without race conditions during simultaneous uploads from multiple users, and both sequential and simultaneous recording uploads by the same user, just to be on the safe side.
- Further milestones are listed at https://cmusphinx.github.io/wiki/pronunciation_evaluation#milestones1